KittHaven
New member
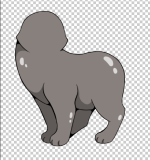
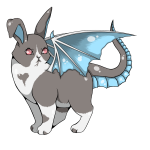
Hello! I've been playing with ImageMagick for a hobby pet site using the Mysidia script and I have a page working to put together the layers, which is great. but I have an issue where the colorise is making the layers too dark. The layers that get colorised are black by default so colorise is taking that and making the hex/rgb shades darker.
Now I know of the clut function to replace colours but I have no idea at all how to utilise it lol. But as my layers to be recoloured are all solid black, I hope using clut could be better than having darker colours than intended.
Body colour:

Actual intended colour:

Here is my code in customgeneratecontroller.php (it's a bit messy with backslashes as I use WAMP and it wouldn't work any other way lmao)
public function index(){
$mysidia = Registry::get("mysidia");
$custom_session = $mysidia->db->select("custom", array(), "uid='{$mysidia->user->getID()}'")->fetchObject();
// Remember to order these in reverse, the last element in the array should always be the top layer you will see (usually lineart). All images should be the same dimensions.
$images = array(
'http:\\\\127.0.0.1\\mysidia\\images\\adopts\\' . $custom_session->species . '\\adult\\wings\\' . $custom_session->wings . '_colour_back.png',
'http:\\\\127.0.0.1\\mysidia\\images\\adopts\\' . $custom_session->species . '\\adult\\wings\\' . $custom_session->wings . '_lines_' . $custom_session->body . '_back.png',
'http:\\\\127.0.0.1\\mysidia\\images\\adopts\\' . $custom_session->species . '\\adult\\tail\\' . $custom_session->tail . '_colour.png',
'http:\\\\127.0.0.1\\mysidia\\images\\adopts\\' . $custom_session->species . '\\adult\\tail\\' . $custom_session->tail . '_lines_' . $custom_session->body . '.png',
'http:\\\\127.0.0.1\\mysidia\\images\\adopts\\' . $custom_session->species . '\\adult\\ears\\' . $custom_session->ears . '_colour2_back.png',
'http:\\\\127.0.0.1\\mysidia\\images\\adopts\\' . $custom_session->species . '\\adult\\ears\\' . $custom_session->ears . '_colour1_back.png',
'http:\\\\127.0.0.1\\mysidia\\images\\adopts\\' . $custom_session->species . '\\adult\\ears\\' . $custom_session->ears . '_lines_' . $custom_session->body . '_back.png',
'http:\\\\127.0.0.1\\mysidia\\images\\adopts\\' . $custom_session->species . '\\adult\\body\\' . $custom_session->body . '_colour.png',
'http:\\\\127.0.0.1\\mysidia\\images\\adopts\\' . $custom_session->species . '\\adult\\body\\' . $custom_session->body . '_lines.png',
'http:\\\\127.0.0.1\\mysidia\\images\\adopts\\' . $custom_session->species . '\\adult\\ears\\' . $custom_session->ears . '_colour2_front.png',
'http:\\\\127.0.0.1\\mysidia\\images\\adopts\\' . $custom_session->species . '\\adult\\ears\\' . $custom_session->ears . '_colour1_front.png',
'http:\\\\127.0.0.1\\mysidia\\images\\adopts\\' . $custom_session->species . '\\adult\\ears\\' . $custom_session->ears . '_lines_' . $custom_session->body . '_front.png',
'http:\\\\127.0.0.1\\mysidia\\images\\adopts\\' . $custom_session->species . '\\adult\\face\\' . $custom_session->face . '_sclera.png',
'http:\\\\127.0.0.1\\mysidia\\images\\adopts\\' . $custom_session->species . '\\adult\\face\\' . $custom_session->face . '_iris.png',
'http:\\\\127.0.0.1\\mysidia\\images\\adopts\\' . $custom_session->species . '\\adult\\face\\' . $custom_session->face . '_nose.png',
'http:\\\\127.0.0.1\\mysidia\\images\\adopts\\' . $custom_session->species . '\\adult\\face\\' . $custom_session->face . '_lines.png',
'http:\\\\127.0.0.1\\mysidia\\images\\adopts\\' . $custom_session->species . '\\adult\\wings\\' . $custom_session->wings . '_colour_front.png',
'http:\\\\127.0.0.1\\mysidia\\images\\adopts\\' . $custom_session->species . '\\adult\\wings\\' . $custom_session->wings . '_lines_' . $custom_session->body . '_front.png'
);
// // This creates the Imagick class that we will use.
$composed_image = new \Imagick($images);
$composed_image->setIteratorIndex(0);
$composed_image->colorizeImage("$custom_session->wings_colour", 1, true); // Colours the back wings
$composed_image->setIteratorIndex(2);
$composed_image->colorizeImage("$custom_session->body_colour", 1, true); // Colours the tail the same as the body
$composed_image->setIteratorIndex(4);
$composed_image->colorizeImage("$custom_session->inner_ear_colour", 1, true); // Colours the back inner ear
$composed_image->setIteratorIndex(5);
$composed_image->colorizeImage("$custom_session->body_colour", 1, true); // Colours the back outer ear the same as the body
$composed_image->setIteratorIndex(7);
$composed_image->colorizeImage("$custom_session->body_colour", 1, true); // Colours the body
$composed_image->setIteratorIndex(9);
$composed_image->colorizeImage("$custom_session->inner_ear_colour", 1, true); // Colours the front inner ear
$composed_image->setIteratorIndex(10);
$composed_image->colorizeImage("$custom_session->body_colour", 1, true); // Colours the front outer ear the same as the body
$composed_image->setIteratorIndex(12);
$composed_image->colorizeImage("$custom_session->sclera_colour", 1, true); // Colours the sclera
$composed_image->setIteratorIndex(13);
$composed_image->colorizeImage("$custom_session->iris_colour", 1, true); // Colours the iris
$composed_image->setIteratorIndex(14);
$composed_image->colorizeImage("$custom_session->nose_colour", 1, true); // Colours the nose
$composed_image->setIteratorIndex(16);
$composed_image->colorizeImage("$custom_session->wings_colour", 1, true); // Colours the front wings
// As you see above, by calling setIteratorIndex(), you switch your "working layer" to the layer you wish to modify.
// Now lets flatten it and display it. This creates a new Imagick instance to work with only one flat image.
$image = $composed_image->mergeImageLayers(\Imagick::LAYERMETHOD_FLATTEN);
$image->setImageFormat('png');
header('Content-type: image/png');
echo $image->getImageBlob();
}
Thank you ! Hopefully someone knows what I should do lol
Now I know of the clut function to replace colours but I have no idea at all how to utilise it lol. But as my layers to be recoloured are all solid black, I hope using clut could be better than having darker colours than intended.
Body colour:

Actual intended colour:

Here is my code in customgeneratecontroller.php (it's a bit messy with backslashes as I use WAMP and it wouldn't work any other way lmao)
public function index(){
$mysidia = Registry::get("mysidia");
$custom_session = $mysidia->db->select("custom", array(), "uid='{$mysidia->user->getID()}'")->fetchObject();
// Remember to order these in reverse, the last element in the array should always be the top layer you will see (usually lineart). All images should be the same dimensions.
$images = array(
'http:\\\\127.0.0.1\\mysidia\\images\\adopts\\' . $custom_session->species . '\\adult\\wings\\' . $custom_session->wings . '_colour_back.png',
'http:\\\\127.0.0.1\\mysidia\\images\\adopts\\' . $custom_session->species . '\\adult\\wings\\' . $custom_session->wings . '_lines_' . $custom_session->body . '_back.png',
'http:\\\\127.0.0.1\\mysidia\\images\\adopts\\' . $custom_session->species . '\\adult\\tail\\' . $custom_session->tail . '_colour.png',
'http:\\\\127.0.0.1\\mysidia\\images\\adopts\\' . $custom_session->species . '\\adult\\tail\\' . $custom_session->tail . '_lines_' . $custom_session->body . '.png',
'http:\\\\127.0.0.1\\mysidia\\images\\adopts\\' . $custom_session->species . '\\adult\\ears\\' . $custom_session->ears . '_colour2_back.png',
'http:\\\\127.0.0.1\\mysidia\\images\\adopts\\' . $custom_session->species . '\\adult\\ears\\' . $custom_session->ears . '_colour1_back.png',
'http:\\\\127.0.0.1\\mysidia\\images\\adopts\\' . $custom_session->species . '\\adult\\ears\\' . $custom_session->ears . '_lines_' . $custom_session->body . '_back.png',
'http:\\\\127.0.0.1\\mysidia\\images\\adopts\\' . $custom_session->species . '\\adult\\body\\' . $custom_session->body . '_colour.png',
'http:\\\\127.0.0.1\\mysidia\\images\\adopts\\' . $custom_session->species . '\\adult\\body\\' . $custom_session->body . '_lines.png',
'http:\\\\127.0.0.1\\mysidia\\images\\adopts\\' . $custom_session->species . '\\adult\\ears\\' . $custom_session->ears . '_colour2_front.png',
'http:\\\\127.0.0.1\\mysidia\\images\\adopts\\' . $custom_session->species . '\\adult\\ears\\' . $custom_session->ears . '_colour1_front.png',
'http:\\\\127.0.0.1\\mysidia\\images\\adopts\\' . $custom_session->species . '\\adult\\ears\\' . $custom_session->ears . '_lines_' . $custom_session->body . '_front.png',
'http:\\\\127.0.0.1\\mysidia\\images\\adopts\\' . $custom_session->species . '\\adult\\face\\' . $custom_session->face . '_sclera.png',
'http:\\\\127.0.0.1\\mysidia\\images\\adopts\\' . $custom_session->species . '\\adult\\face\\' . $custom_session->face . '_iris.png',
'http:\\\\127.0.0.1\\mysidia\\images\\adopts\\' . $custom_session->species . '\\adult\\face\\' . $custom_session->face . '_nose.png',
'http:\\\\127.0.0.1\\mysidia\\images\\adopts\\' . $custom_session->species . '\\adult\\face\\' . $custom_session->face . '_lines.png',
'http:\\\\127.0.0.1\\mysidia\\images\\adopts\\' . $custom_session->species . '\\adult\\wings\\' . $custom_session->wings . '_colour_front.png',
'http:\\\\127.0.0.1\\mysidia\\images\\adopts\\' . $custom_session->species . '\\adult\\wings\\' . $custom_session->wings . '_lines_' . $custom_session->body . '_front.png'
);
// // This creates the Imagick class that we will use.
$composed_image = new \Imagick($images);
$composed_image->setIteratorIndex(0);
$composed_image->colorizeImage("$custom_session->wings_colour", 1, true); // Colours the back wings
$composed_image->setIteratorIndex(2);
$composed_image->colorizeImage("$custom_session->body_colour", 1, true); // Colours the tail the same as the body
$composed_image->setIteratorIndex(4);
$composed_image->colorizeImage("$custom_session->inner_ear_colour", 1, true); // Colours the back inner ear
$composed_image->setIteratorIndex(5);
$composed_image->colorizeImage("$custom_session->body_colour", 1, true); // Colours the back outer ear the same as the body
$composed_image->setIteratorIndex(7);
$composed_image->colorizeImage("$custom_session->body_colour", 1, true); // Colours the body
$composed_image->setIteratorIndex(9);
$composed_image->colorizeImage("$custom_session->inner_ear_colour", 1, true); // Colours the front inner ear
$composed_image->setIteratorIndex(10);
$composed_image->colorizeImage("$custom_session->body_colour", 1, true); // Colours the front outer ear the same as the body
$composed_image->setIteratorIndex(12);
$composed_image->colorizeImage("$custom_session->sclera_colour", 1, true); // Colours the sclera
$composed_image->setIteratorIndex(13);
$composed_image->colorizeImage("$custom_session->iris_colour", 1, true); // Colours the iris
$composed_image->setIteratorIndex(14);
$composed_image->colorizeImage("$custom_session->nose_colour", 1, true); // Colours the nose
$composed_image->setIteratorIndex(16);
$composed_image->colorizeImage("$custom_session->wings_colour", 1, true); // Colours the front wings
// As you see above, by calling setIteratorIndex(), you switch your "working layer" to the layer you wish to modify.
// Now lets flatten it and display it. This creates a new Imagick instance to work with only one flat image.
$image = $composed_image->mergeImageLayers(\Imagick::LAYERMETHOD_FLATTEN);
$image->setImageFormat('png');
header('Content-type: image/png');
echo $image->getImageBlob();
}
Thank you ! Hopefully someone knows what I should do lol
Last edited by a moderator:


